Uncategorized

There Gose Sea Breeze Ready to Drink

There Gose Sea Breeze

There Gose Sea Breeze

I was pushing it to get this beer ready for Thanksgiving at the beach. As a reminder, I used dried hibiscus flowers to make a tea concentrate to mimic the color and flavor of cranberry, and vodka soaked grapefruit zest to complete the attempt to tie the beer to a Sea Breeze cocktail. Since we spend Thanksgiving at the beach, the Sea Breeze name ties it to our Thanksgiving location and the cranberry flavor and color evokes the holiday. Today is the Sunday before Thanksgiving, I’m at the beach, and I’m testing a bottle that I refrigerated for 24 hours.

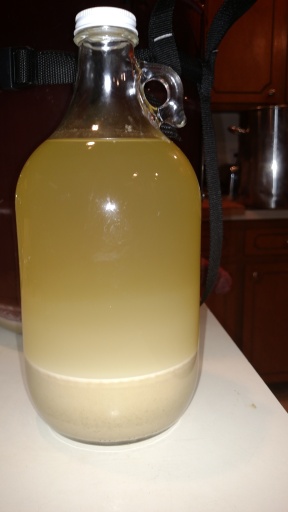
The result? I’m declaring a success! The color is nice…maybe slightly pale. It’s not clear, but that’s expected in a wheat beer. It just makes it look look more like a cranberry jelly. The aroma is hard to describe…but it’s a nice fruity, almost candy scent. The flavor is subtly salty with a tang in the finish. I think there’s a little bitterness/sharpness from the grapefruit zest. I’m not sure if the coriander is really contributing much…but maybe it’s just blending well and doing that “Je ne se crois” thing. The carb is very good, with a white, thin layer retained throughout the drink. I was concerned that I bottled too soon and that it might overcarb, but it’s good. When I get home, I think I’ll refrigerate what’s left, so that it stops or slows any possible additional carbing.

As usual, I’ll be responsible for cooking and carving the Turkey. I’ll also make a broccoli casserole. I have a batch of my traditional Scottish shortbread  https://mmmfoodies.wordpress.com/2015/11/14/traditional-scottish-shortbread/

and, for the first time, I will Make my Dad’s Yeast Rolls

https://mmmfoodies.wordpress.com/2015/07/12/my-dads-rolls/

…something I tried last year and failed. This year, I have the right recipe and I have tested it successfully, twice. And with the beer to toast, it should be a great meal! I feel like this style of beer will compliment the big meal and cut through some of the richness. It may also contribute to the after-meal nap!

Happy Thanksgiving to all!

Standard
Uncategorized

Bottling There Gose Sea Breeze and Wine Update

Racking the gose to a bottling bucket.

Racking the gose to a bottling bucket.

With two weeks and one day to go until Thanksgiving, I’m counting on the “There Gose Sea Breeze” being done with fermentation, so I can bottle it. I did do an SG check and it was 1.015 still,

FG is 1.015 after temperature correction.

FG is 1.015 after temperature correction.

so…fingers crossed. I bought new bottles and made sure everything was washed well, and sanitized. I hope it carbs reasonably for Thanksgiving. I’m sure I’ll have plenty left for Christmas and New Year’s Eve…there’s 49 twelve ounce bottles.

Bottled and ready to carb!

Bottled and ready to carb!

I did the calculations for priming sugar a bit low, on purpose…I have a history of overcarbing. Instead of over 3.0 vols, which is supposedly what the style should be, I went with 2.4 vols and 4 ounces of sugar.

Two other quick notes: First, I worked up a recipe for what I want my next project to be: Fluffernutter Sandwich Stout. Looking forward to trying to brew it between Thanksgiving and New Year’s. That way, it should be ready to drink starting late January. I will be posting the recipe and results here when I get to it.

Second, I took the small jug of Blueberry-Muscadine Wine and topped off the 5 gallon carboy, to reduce the head space.

Making the head space smaller.

Making the head space smaller.

The rest of the jug was bottled in a 22 oz “bomber”. The bulk will go for longer term conditioning. When I topped it off though, it got kind of fizzy, so I added another crushed Campden Tablet to it. I also double-checked the airlock to make sure it wasn’t stuck.  There’s even a little left over for me!

Sample!

Sample!

Standard
Uncategorized

Checking the Specific Gravity on There Gose a Sea Breeze

Hydrometer Sample

Hydrometer Sample

After I racked to secondary, added the grapefruit zest and hibiscus tea concentrate, there seemed to be some additional fermentation happening. It wasn’t much…in fact, I was afraid the little white bubbles were going to turn out to be an infection. However, they did eventually fade away.  The OG was supposed to be 1.062, and it came in at 1.063. The current SG reading is 1.014 with a temperature of 72.8F.

Hydrometer reading.

Hydrometer reading.

After temperature correction for the hydrometer, the actual SG is 1.015, which is .001 above expected FG. Considering that the OG was .001 high, fermentation could be done.

The thing is, I really want this beer to be carbed and ready to drink by Thanksgiving, which is about 2-1/2 weeks away and carbing will likely take at least 10 days. I’d rather give it a month, but it is what it is. So, just in case the fermentation isn’t COMPLETELY done, and, considering my history with over-carbonation…I think I will bottle in new bottles, underestimate the priming sugar, and cross my fingers.

Regarding the beer’s other characteristics, I am hopeful. The sample is a pretty cranberry color, the front end is appropriately a little salty (but not overly so), then there’s tart, followed by a little sour in the finish. The thing is, I don’t know how to describe the aroma or the flavor. I think the hibiscus is giving it a little cranberry character, but I’m not sure how the coriander and grapefruit zest are influencing the flavor. There’s obviously a blended flavor there. I just don’t have the palate and experience to put it into “proper” tasting terminology. But I like it. I really look forward to getting some feedback from some more experienced brewers.

Standard
Uncategorized

Racking There Gose Sea Breeze and Blueberry-Muscadine Wine

Racking the gose base onto the grapefruit zest.

Racking the gose base onto the grapefruit zest.

Fermentation seems to have slowed way down on the “There Gose Sea Breeze” beer and I’m trying to get it done for Thanksgiving, so I racked it today. Problem: my Blueberry-Muscadine Wine is in my other carboy. I need a third to make this process work. So, I went to a local home brew shop to check out my options. I decided to go with a 5 gallon Better Boy brand plastic carboy with a port on it for a tap. That will allow me to use it like a bottling bucket, rather than having to use a siphon. Maybe this will reduce the chance for infection by one more function…maybe. Seems like a good system, but the tap is a bit tricky to install and it ain’t cheap. The carboy itself was about $28. Then, the tap comes as two separate pieces that add up to about another $30. Then, I needed the special size of stopper for the top, some 1/2″ tubing and a 1/2″ diameter bottling cane. Altogether, with tax, it was about $85.

After I got everything organized, cleaned, put together, and sanitized, things went pretty smoothly. I went with the 5 gallon Better Boy because I plan to generally use it for secondary fermentations and, at that point, usually I’m down in that range. When I racked the wine, I got a nice, full 5 gallons.

Blueberry-Muscadine Wine racked for some bulk conditioning.

Blueberry-Muscadine Wine racked for some bulk conditioning.

I then squeaked out about another quart, into a half gallon glass jug. I may go ahead and bottle that in a 22 oz bomber, when I get a chance. There’s too much head space there and I don’t want it to oxidize.

Once the wine was transferred and the glass carboy it was in was cleaned and sanitized, I prepared to rack the beer into it. I set-up the siphon and hose. Next, I added the grapefruit zest and vodka from the freezer to the carboy and began racking the beer onto it.

Grapefruit zest and vodka from the freezer.

Grapefruit zest and vodka from the freezer.

Once that was all squared away, I started making the hibiscus tea.

Unsweetened, dried hibiscus flowers.

Unsweetened, dried hibiscus flowers.

I used a quart of hot Culligan (bottled) water and 5 oz of dried hibiscus flowers to a 2 quart stainless steel sauce pan.

Steeping to a beautiful concentrate.

Steeping to a beautiful concentrate.

Since I didn’t have one a bit bigger, I went ahead and brought another quart of the water to a boil in a big stainless stock pot. After the hibiscus flowers were brought to a boil, I covered them and turned off the heat. The other water boiled for a few minutes and, after the flowers steeped for 10 minutes, I strained the tea concentrate into the boiling water. I cleaned the smaller pot and then strained the entire amount of liquid back into it and it just did manage to fill it completely. Note here…steeped hibiscus flowers don’t do well in a garbage disposal unit. I should have composted them. Live and learn. After a little disposer cleaning, I got back to my hibiscus concentrate and funneled it into a sanitized glass container, covered it with sanitized plastic wrap and stuck it in the refrigerator to cool overnight.

Bringing the temp down on the hibiscus tea concentrate.

Bringing the temp down on the hibiscus tea concentrate.


The final thing I wanted to accomplish tonight was to attempt to harvest some yeast. If I like the result in this gose, I wouldn’t mind making another gose or a maybe try making a kolsch, before the really cold weather starts coming around. So, for tonight, I poured off some of the trub that was left behind in the carboy that I racked out of and funneled it into a sanitized 1/2 gallon glass jug.

Attempting to harvest some yeast for future use.

Attempting to harvest some yeast for future use.

I topped that off with Culligan bottled water and added a sanitized cap. I’ll let that sit out overnight and separate. I’ll update here tomorrow when I add the hibiscus tea concentrate and further separate the yeast.

11/2/15 update: Added the hibiscus tea to the gose and it looks like a giant jar of cranberry sauce!

IMG_20151102_070230010

I also decanted the liquid off of the yeast I’m trying to harvest. My understanding is that the yeast is the thin whitish layer on the top of the sediment. I transferred that to a pint jar and added water, We’ll see how that settles.

Transferred yeast to smaller jar and added water.

Transferred yeast to smaller jar and added water.

Yeast settled for harvest.

Yeast settled for harvest.

Standard
Uncategorized

I’m a Grandpa! (And General Update on Brews)

IMG_20150419_192135858

Let’s just get this out of the way: Yes, I’m a Grandpa! My grandson was born on April 17, 2015 @11:23 p.m. and weighed in at 7 lbs 13 oz. I’m as proud as I can be!

Okay, back to brewing and fermenting stuff. Three things: Steinpilz Gose, Belgo Paleo Pale Ale, and kombucha.

The Steinpilz Gose has been in the bottles for a couple of weeks now an my friend picked up the rest for kegging  a little over a week ago. I have opened a bottle and tried it and she has tried it from the keg. Unfortunately, she does NOT like mushrooms, so it isn’t really her “thing”, but she said that it is “technically” good. Haha…I’ll take it. I think the bottled version needs more carbonation, but it is not bad. There’s not much aroma, but what I get is that German wheat beer smell with the earthiness from the mushrooms. The flavor is good…definitely has the German character. As for the gose style, I thing the tartness is good, but it could use just a little more salt. The earthy mushroom flavor is very present, but not overpowering. I look forward to trying the kegged version and getting some feedback from some more people (that like mushrooms, hopefully!).

Steinpilz Gose from the bottle after about 2 weeks.

Steinpilz Gose from the bottle after about 2 weeks.

Belgo Paleo. This has been an odd start. The home brew shop guy said the yeast, Safbrew Abbaye, is the one some brewers use for Belgian trippels and quads, so to not let it go crazy…maybe put it in my spare shower and run some cold water into the tub to lower the temperature a little. The first two days, the yeast ripped into the wort…it actually seemed finished after three days. Late at night on day 2, I replaced the blow-off tube with an airlock and moved the carboy to the shower and added water to the tub. The initial temps were around 70-72F. The tub water slowly leaked out over the course of a week. Last night, I took a sample for hydrometer testing and the temp was 68.5F. The thing is, the SG is 1.020 and it is supposed to get down to 1.009. I reached out to my online brewing friends and it was suggested that I should have increased the temperature after the first day or two…exactly opposite of the advice from the LHBS guy. *steam* I have brought the carboy back into the kitchen and need to check it in another week.

Belgo Paleo at S.G. 1.020

Belgo Paleo at S.G. 1.020

Kombucha…I have SCOBY’s to spare and plenty to share! The 1 gallon jars with spigots are working out great for draining off the ready-to-drink kombucha.

Fresh batch, ready to start fermenting.

Fresh batch, ready to start fermenting.

SCOBY Hotel

SCOBY Hotel

Fresh batch, ready to start fermenting.

Fresh batch, ready to start fermenting.

Now I can add the tea, sugar, and water back without having to remove the SCOBY and extra starter kombucha to start the next batch. I am on a fairly regular staggered schedule 2 batches fermenting and 1 batch in the fridge to drink.

In the fridge to drink.

In the fridge to drink.

Standard
Uncategorized

Brew Day Belgo Paleo

Ready to Brew!

Ready to Brew!

Brew Day! I’m actually writing this on the day after, but it was a long day. I had to help prepare for my older daughter’s baby shower and, after brewing and planting several things in the garden, I had to go help with the clean up. I was sore and tired last night!

First, I want to address the fact that I have had an ongoing problem with overcarbonation in several of my brews. Most have been darker beers…stout, porter, Scottish ale; but that may not necessarily have anything to do with it. I’ve tried backing down on priming sugar, extending the fermentation period, careful sanitizing procedures. I have been wondering if maybe the equipment I’m using or the bottles may need replacing or heavy duty cleaning, rather than rinsing and sanitizing. Before this brew, I soaked EVERYTHING in a solution of Arm & Hammer Super Washing Soda…carboy, buckets, utensils, hoses, siphon, airlocks and stoppers. Before I bottle, I will soak the bottles in the same solution, run them through the dishwasher (including heated drying cycle), and sanitizing. If this batch winds up overcarbing, I will have NO clue what to try next. Keeping my fingers crossed.

The recipe I brewed is a Belgian Pale Ale called Belgo Paleo and it sounds pretty good. It uses Green Bullet hops for buttering, Tettnang at 30 minutes and Saaz at 15 minutes and dry hop. The yeast is a packet of dry Safbrew Abbaye.

Pellet hops

Pellet hops

I followed my usual brew day procedures, with one exception: I used my new stainless steel wort chiller for the first time!

New stainless steel wort chiller

New stainless steel wort chiller

I didn’t have to buy 8 bags of ice this time! I set up the chiller with hoses and kept it in a bucket of sanitizer until ready to use. I put the chiller in the kettle for the last 15 minutes of the boil, to sanitize it.

Unfortunately, I can’t seem to manage leak-proof connections and a little water sprayed into the wort. It was right after flame-out, and I’m hoping it didn’t ruin the batch. I wrapped the connection in paper towels and the dripping happened away from the kettle, instead of into it. The chiller worked like a champ and my wort was down to pitching temp in under twenty minutes.

Most difficult part of the day? Pouring the wort from the kettle (actually, a S/S stock pot) through a funnel into the glass carboy. Next time, I’ll use a siphon! Should have aerated it well, though! And it’s a good thing, because the oxygen tank I have connected to an aerating “stone” evidently had the valve knocked open somehow and the canister was empty.

Ready for fermentation to start.

Ready for fermentation to start.

So, pitched the yeast and put on the airlock. There was action late last night and I heard that the Abbaye yeast is aggressive, so I switch the airlock to a blow-off tube set-up …

After fermenting 24 hours.

After fermenting 24 hours.

Blow-off tube and wrapped to keep light out.

Blow-off tube and wrapped to keep light out.

…and wrapped the carboy with a blanket to keep out light. The wort chugged all day today and is doing well, I think. As of tonight, about 32 hours after pitching the yeast, the bubbling has slowed slightly to once every few seconds.

Update: Steinpilz Gose: my brewbuddy came by and got the balance of the gose into a keg and is going to force carbonate it. I’m going to stick a couple of bottles in the fridge and we’ll compare when ready. Looking forward to that!


Standard
Uncategorized

Racking Steinpilz Gose to Secondary Fermentation

Time to rack the gose.

Time to rack the gose.


The Steinpilz Gose has slowed way down on the airlock bubbling. I don’t want the porcini mushrooms to rot, so I’m racking to secondary, to finish fermentation without the mushrooms and trub.

Chunk of floating 'shroom. Trub, Time to rack!

Chunk of floating ‘shroom. Trub, Time to rack!

The specific gravity is down to 1.015 and the target is 1.011, so it doesn’t have far to go, but, again, I’m not going to rush it. I still need to get my carbonation issues under control.

Speaking of the carbonation issues, I did my primary fermentation in my glass carboy, instead of my plastic bottling bucket. I also bought a new hose for the racking process and racked to a plastic carboy…a “Bubbler” by Northern Brewer, that was given to me by a brewer friend who doesn’t use it anymore.

Racked to a plastick Bubbler for secondary fermentation.

Racked to a plastick Bubbler for secondary fermentation.

Everything was well-washed and sanitized. I’m hoping for the best when I bottle, but my friend is going to keg a couple of gallons for comparison. I’ve never kegged before, so that’s kind of exciting!

Back to today’s process: everything went smoothly and I wound up with just under 5 gallons. I took a hydrometer sample, as mentioned above and it looked good. I tasted the sample and I think it’s good.IMG_20150228_170311015

1.014 @ 68F = 1.015 SG

1.014 @ 68F = 1.015 SG

I taste the mushroom, but it’s not overpowering. I don’t think the mushroom tea at bottling step will be necessary; but it might need more salt. The original gravity was 1.054 and the current SG of 1.015 puts the ABV at a little over 5%. It should finish around 5.25% ABV. I’m going to let the Gose go for at least 10 days in secondary…maybe 2 or 3 weeks. Maybe a week in tertiary…we’ll see. Right now, I’m feeling pretty good about it. Cheers!

Standard
Uncategorized

Brew Day! Steinpilz Gose

Dried porcini mushrooms, salt , hops (Willamette), and acidulated malt.

Dried porcini mushrooms, salt , hops (Willamette), and acidulated malt.

This has the potential to be really good, if I get it right…but it may sound pretty gross. I’ve brewed a beer today in a German style that is relatively obscure, but making a big comeback. The style is called “Gose” and is pronounced “goe-zuh”. Rather than go into a lengthy description, here’s a link that covers the history and details very well:

http://www.germanbeerinstitute.com/Gose.html

If you just want the brief version, it’s a beer made from barley and wheat malts and has a slightly sour and salty taste, usually with coriander. No, that’s not the most appealing description; but it really is quite good. Very refreshing. Every drink makes you want to take another! So, here’s where I push the limits even more: mushrooms! Instead of coriander, I’m flavoring my gose with dried porcini mushrooms. In German, porcinis are known by the name “steinpilz”, so, my beer is Steinpilz Gose. Stay with me now…the slightly salty/sour flavor, I believe, will go well with a savory pairing like the earthy flavors of the dried porcinis. I did a little tasting ahead of time…lighter beer with  few drops of porcini “tea” added. Actually, it was interesting and tasty! The trick will be getting the balance right. I want an earthy background note…not an aggressive flavor that would readily be identified as mushroom.

There are a few ways that I have read about to achieve the savory/sour component. Traditionally, lacto bacillus is used at some point (which varies, depending on who you ask). Another way is to create a sour mash ahead of your brew day…a little involved for my skill and equipment profile. And the lacto can be tricky, too. I settled for the use of acidulated malt.

I brew using a method referred to as “BIAB”, “Brew In A Bag”. The “mash-in” step is pretty standard…the milled wheat and barley malts are brought up to 149F and held there for 60 minutes.

Wrapped in a blanket and a "survivior" blanket to hold mash temperature.

Wrapped in a blanket and a “survivior” blanket to hold mash temperature.

Instead of draining the grains and going on to the boil, however, the acidulated malt is added and the temperature held at 149F for an additional 45 minutes. The reason for doing this is that the acid in the acidulated malt could inhibit saccharification (the conversion of starches to sugars. After the second mash step, the brew proceeds as normal.

Getting the water amount right has been a little tricky for me, but I wound up with 5-3/4 gallons of wort, after the boil. The original gravity is substantially higher than the target, though…1.054 instead of 1.045. Not a huge deal…more alcohol, but I just wonder why? Was I supposed drain and remove the first round of grain and just mash the acidulated malt? (As opposed to adding the acidulated malt to the existing grains and mashing ALL of them for the additional 45 minutes.)

Anyway, chilled the wort, aerated it,

Aerating with an oxygen "stone".

Aerating with an oxygen “stone”.

and pitched the German Ale/ Kolsh yeast. There’s not a lot of headspace in the carboy…I’ll have a blow-off tube ready, just in case.

About 5-3/4 gallons in primary fermentation.

About 5-3/4 gallons in primary fermentation.

When it’s done, I think a friend of mine is going to keg half of the batch to see how that compares to bottling. I’ve had an issue with overcarbonation that I can’t seem to figure out. My beer hits an optimum point and then, another month or more, and they start to get overcarbed. I’m looking forward to seeing how that “gose”! (Sorry.)

Update 2/22/15: Had to install the blow-off tube this morning. I guess those yeasties are happy!

Blow-off tube...yeast is chowing down!

Blow-off tube…yeast is chowing down!


Standard