Uncategorized

Tasting Jackfruit Cider … Finally!

‘Memba me?!

A bottle of jackfruit cider has been in my refrigerator for a few weeks now. I figured it was time to test it out, since I began this project on June 2, 2015! I bottled it on August 23, 2015, so I’m right at one month away from 2 years. Since the final gravity hit 0.99, I knew it would be dry…plus, over 12% ABV.

So, how is it? Well, first positive sign is the burp of carbonation when I pop the cap. The pour is fizzy, but no head. The color is a light golden and beautifully clear.

Jackfruit Cider… almost 2 years later.

I don’t have a great nose, but there isn’t a big aroma. Just inside the mouth is the fizzy tingle…the carbonation really turned out just right. On the swallow, it’s like a dry champagne on the tongue. It’s quickly followed by a flavor I can’t really describe, due to my lack of experience, I’m sure. It’s obviously not grape. Could be mistaken for something like crabapple, but then it has what I can only think to describe as “musty”. If this is what became of the odd “off” flavor I got from jackfruit originally, I’ll take it. Previously, I was kind of put off with jackfruit, because, despite the banana/peach kind of flavors, the other component was like rotting onion (best way I could come up to describe it). After the little musty hit, was a mild bitterness and something vaguely familiar to the original fruit flavors…though still quite dry.

I have to say, the alcohol burn is practically gone. Not harsh, at all! I’m looking forward to getting some opinions from qualified friends. I’m impressed that it isn’t bad. I wonder if anyone will actually say it’s good? Though not an expert, I would say it’s okay. I think it would be better if I had stopped short of completely fermenting it out? Anyway, fresh jackfruit is a pain in the butt to process, but maybe it was worth the experiment!


Standard
Uncategorized

Racking Muscadine Wine 2016

Time to make some wine.

Time to make some wine.


Well, I racked the muscadine wine. Unfortunately, one of my plastic carboys in missing in action, so I racked it into my glass one. I added one crushed Campden tablet to the new carboy and away we went…from the bottling bucket in which I did primary fermentation to the glass carboy.

Racking to the carboy.

Racking to the carboy.

My carboy is over 5-1/2 gallons and racking left me a little under 5 gallons. In order to prevent oxidation, I topped off with about 1.25 gallons of Culligan bottled water. I know it will drop the alcohol a bit and dilute the wine, but I actually want something lighter than the wine from last couple of years. I might even backsweeten a little after fermentation is complete and the wine is stabilized.

Nice color. Topped up with Culligan bottled water.

Nice color. Topped up with Culligan bottled water.

The color is nice…a kind of purple version of a rose’. The flavor still has a little muscadine flavor. I’m hoping when conditioning is done and I backsweeten and bottle, I will have an easy-drinking wine that will be a “half-sweet” wine that will be ready to drink in a year.

Update 10/18/16: Okay, I racked the wine off of the lees and it’s really nice and clear. I wound up with a little under a half of a gallon excess…might use it to experiment with backsweetening. Also took a hydrometer sample…looks like 1.001, after adjusting for temperature. So, it’s pretty dry, at the moment. Once I’m sure it’s stable and won’t start fermenting again, I’ll adjust the sweetness. I did add another crushed Campden tablet to hopefully achieve stabilization…it may take an overnight outside on a cold night…but there’s plenty of time. I’d just rather not add Campden after this point. A quick sip reveals that it doesn’t taste bone dry, which is good! And it’s a light body. This one may actually be ready to drink next Summer.

Standard
Uncategorized

Brew Day: Railer’s Pale Ale

Brew in a Bag set up (BIAB)...draining the grains

Brew in a Bag set up (BIAB)…draining the grains

A friend recently asked if I would be interested in joining her in providing a homebrew for an event. The event is just prior to the local soccer team’s game. The team is the Carolina Railhawks, so I’m making a beer I’m calling Railer’s Pale Ale. Hopefully, my friend will be able to get my beer into a keg and we will set up beside each other to serve our beers. If the keg doesn’t work out, I can always bottle.

I used an online recipe building program, armed with a basic idea that I wanted to use some frozen, vacuum sealed Cascade hops for the bittering/background “canvas”, with a combination of Mosaic and Citra hops for flavor and aroma. The Mosaic add a resinous flavor and the Citra are, surprise! citrusy.

Cascade whole hops that had been vacuum sealed and frozen.

Cascade whole hops that had been vacuum sealed and frozen.

Starting the 60 minute boil with the Cascade hops.

Starting the 60 minute boil with the Cascade hops.

The base grain is an American 2-row. In playing with other grains to get the right alcohol ABV and the right color, I picked a few specialty grains. Then, after a little research, Wyeast American Ale II 1272 “smack pack” for the yeast. At the lower recommended temperature range, it is supposed to produce a clean, crisp result that accentuates the citrus componants. I went ahead and took the yeast out and activated it early on.

I put my recipe out for some fellow brewers to look at, but didn’t get any feedback before I had to go pick-up the ingredients. After I milled the grains and came home, I see a note from an experienced brewer who said I had too much specialty grain (28% of the grain bill) and should cut them in half and make up the difference with more 2-row. Ugh. The comment is that the beer will be too sweet. Well, I’m kind of stuck now. I can’t waste the time or money on buying more grain for a beer that is going to be given away. Ah, well. I hope that the hop selections will help counteract some of the sweetness that I’m being told is going to be there. At the very least, it will be beer, and it should be drinkable. Mine may not be picked by the fans as the best one there, but I’m not expecting to be in that group anyway…I’m probably the novice of the group.

So, without going through all the individual brew steps here, I’ll hit just a few points. The brew went pretty well as far as the step go. The mash temperature was overshot, as I usually do, not matter how careful I try to be. I used a little Culligan water, cold, to bring the temperature down into my target range. And flies and bees started showing up to check out the wort. Really got to be irritating! Otherwise, no problem with my little modified sparge or the boil.

My little modified sparge set-up.

My little modified sparge set-up.

I do need to note, that being a Liberal Arts guy, “brewhouse efficiency” and some of the more technical calculations in the process are pretty much a guessing game for me. I had the efficiency at 63% in the recipe, based on a previous brew that seemed fairly accurate. When I checked the specific gravity (SG) between the mash and the boil, I got 1.054. The post boil gravity was only supposed to be 1.052, so my efficiency was more like 71%. I adjusted it in the recipe, and the end result will be just a little higher alcohol content,,,but not crazy. It will still only be (estimated at this point) 5.15% ABV. That should be fine.

I chilled with an immersion coil. The tap water temperature is 71F, so I knew I wouldn’t get the wort down into the low 70’s.

Stainless steel coil immersion chiller in use.

Stainless steel coil immersion chiller in use.

I managed 83F and transferred to the carboy…started off using siphon, but the whole hops were a challenge and I wound up having to hand-pour about 1/3. A bit messy, but couldn’t be helped.

Siphoning wort into the carboy (on top of my little chest freezer converted to fermentation chamber.

Siphoning wort into the carboy (on top of my little chest freezer converted to fermentation chamber).

I put the wort in my fermentation chamber with an airlock installed, and placed the package of yeast in as well. I let the wort continue to cool for a few hours and then pitched the yeast.

After a couple of hours, I realized the temperature was a little low, so I turned the thermostat up a few degrees and left the lid up on the box to bring the temperture up for awhile. Six hours later, I see the slightest indication that the yeast may be active. A few hours later, I closed the lid to keep the temperature in the range I want, which would be around 65-68F. Now we wait to see if it really takes off…and how it turns out.

Update: 7/23/16    Checked on the progress around noon and we have a good fermentation in progress!

Success!

Success!

Standard
Uncategorized

2014 Muscadine Wine Tasting

Muscadine Wine, my first wine, bottled October 2014

Muscadine Wine, my first wine, bottled October 2014

My last taste of this wine was a little over a year ago, in February 2015. It was my first attempt at wine. I began the batch with foraged muscadine grapes in August of 2014 and was bottled about 2 months later. The ABV, if I read the hydrometer correctly, was right on 16%. It was fairly hot at bottling. I opened a bottle in February, 2015 when it was about 3-1/2 months in the bottle and the notes were basically that it was still kind of hot, but had a nice color, light body, and fairly dry flavor that I would not have guessed was muscadine.

It is now March 4, 2016, so the wine has been bottled for almost a year and a half. While still slightly warm with alcohol and a little tannin, the nose and color are still nice and the body light. The thing that really jumps out immediately, though, is that the flavor has very noticeably softened. It is definitely more drinkable now! I don’t expect muscadine wine to last a decade, but this one is improving and I think it may benefit from even a little more time…but I have no idea when it will “peak” or turn the corner and head downhill. Tonight, however, I’m having a glass of wine that I’m pretty happy with!

Standard
Uncategorized

Bottling and Corking Muscadine-Blueberry Wine

IMG_20151212_213927089

First bottle of blueberry-muscadine wine. (I adjusted it a little more after photo to be flush with top of bottle.)

I have 5 gallons of blueberry-muscadine wine that I started in late August of this year (2015). You can read through the previous posts for the process. My previous wine attempt was a straight muscadine wine that was about 2 gallons and just bottled it in beer bottles. So this is my second wine, but, since I had 5 gallons, I decided to go ahead and put it in actual wine bottles with corks!

5 gallon carboy of blueberry-muscadine wine.

5 gallon carboy of blueberry-muscadine wine.

First, since my brief trend is to make wine once a year, I really didn’t want to invest in a corker. Unfortunately, I do not know anyone that has one I could borrow, either. I do, however, have a friend that had the valuable knowledge that a local home brew shop rents a floor model corker for $5/day! I stopped by today and bought 2 cases of green wine bottles (total of 24 bottles), and a 30 count bag of corks.

Floor model wine bottle corker. Easy to use and adjust.

Floor model wine bottle corker. Easy to use and adjust.

I bought #9 corks, because they are for wines expected to be around something like 5 to 7 years. The #7 and #8 corks were for shorter term storage. The blueberry-muscadine wine is fairly light body and about medium on the dry scale…maybe a little more towards dry. I don’t expect it to last for many years, but there’s a chance a few bottles may wind up getting stashed and discovered sometime in the future…so, better to have a little excess time.

I pulled a sample of the wine for the hydrometer test. Checked the temperature. I got an FG (final gravity) of 0.993. The OG (original gravity) of 1.111 means that we have a wine with 15.49% ABV. Really? It’s hidden pretty well! Pretty color, too, by the way.

Hydrometer sample.

Hydrometer sample.

I went ahead and rinsed and sanitized the bottles and my tubing and bottling wand. I researched cork preparation a little and the consensus seems to be that the type of cork I’m using does not need any soaking, boiling, sanitizing, etc. I filled a test bottle and tried the corker. Very easy. And there is a little threaded washer that can fine-tune the depth that the cork is pushed. It was simple to adjust and get the cork flush. I got a yield of exactly 24 bottles,

First of two cases.

First of two cases.

with just a little extra for enjoying tonight.

Nice color...and little sample for the winemaker.

Nice color…and little sample for the winemaker.

I have to say, it’s very satisfying to see my wine in real deal, bona fide wine bottles! Now…how long before I start giving them away? Just a couple weeks until Christmas…maybe hang on to most of them for a year? Oh…and I need to look into labeling. I mean it IS my first wine in corked bottles, after all!


Standard
Uncategorized

Update/Additional Racking Blueberry-Muscadine Wine

Blueberry-Muscadine Wine sample.

Blueberry-Muscadine Wine sample.

A very brief update on the Blueberry-Muscadine Wine. I racked the wine again (with a Campden Tablet to help insure no contamination), so that I could use the plastic carboy that it was in for a beer project. The wine is now in a slightly smaller, glass carboy. To decrease the head space a little, I added about a gallon of Culligan bottled water.

Racking the wine.

Racking the wine.

There’s plenty of alcohol, so that’s no problem. (ABV, after checking the SG with a hydrometer looks to be about 15.49%!) The flavor is actually pretty good already…not too “hot” or “green”. The color is beautiful and clarity is good. After a few sips, I added a little Sierra Mist soda to the glass…yeah, I know, but I did anyway, and it was really tasty! I will definitely bulk age this wine a little longer and then bottle condition for awhile; but I may just fill a bottle and take on our Thanksgiving trip to the beach and see what people think.

Standard
Uncategorized

Racking Muscadine-Blueberry Wine

Racking wine to secondary fermentation.

Racking wine to secondary fermentation.

I’ve let the muscadine-blueberry wine go as long as I want now, so I racked it to a carboy tonight. It was in a bottling bucket for primary fermentation, so I tried to pull a sample from the spout to test the SG, but there was too much trub. To rack, I had to use a siphon and penetrate the fruit layer.

I added a crushed Campden Tablet to the carboy and started the racking process. The Campden will hopefully start knocking off the yeast that’s still active. I did get a sample and the SG is at 0.991 (0.990 @70.3F)…I would think the yeast would be done!

SG reading

SG reading

But there is still some airlock activity. After racking, it looks a little lower in volume than I thought, but there was about 14 pounds of fruit, so it shouldn’t be surprising.

A little below volume, but high on alcohol, so I added a gallon of bottled water.

A little below volume, but high on alcohol, so I added a gallon of bottled water. (This is before water addition.)

I decided to add another gallon of Culligan water with a crushed Campden Tablet to bump the volume a little. The ABV is 15.75%, prior to the water addition, so I’m not worried about diluting it a little! The color and flavor are nice, so a couple more months of racking and then a few more in the bottles and I think it will be pretty good.

Looking good...dry, but not bone dry.

Looking good…dry, but not bone dry.

Standard
Uncategorized

Blueberry-Muscadine Wine, Adjustments and Yeast

24 hours after Campden Tablets added. Sugar, water, blueberries and muscadines.

24 hours after Campden Tablets added. Sugar, water, blueberries and muscadines.

Day 2 for the Blueberry-Muscadine Wine project…time to check the OG(Original Gravity), check the acid, add the yeast nutrient, pectic enzyme, and pitch the yeast. I started with the refractometer and got a couple different readings from the sample I took after stirring the must. (Of course, I sanitized everything that touched the must). Anyway, I felt like I was at the 1.090 range,but wasn’t confident, so I took a larger sample to check with the hydrometer later.

Sample for testing acid and getting hydrometer reading.

Sample for testing acid and getting hydrometer reading.

From the sample, I removed 3ml to test the acid. Following the instructions for the acid test kit, it looks like I was at a reading of 0.225; shooting for the range between 0.55 and 0.65. The recipe called for 2-1/2 teaspoons of the acid blend, but I needed the full 2 ounces that I purchased to get to 0.565. At the minimum of the range, but okay. I also added 2-1/2 teaspoons of pectic enzyme and 3 teaspoons of yeast nutrient. Added to the must and stirred in. Then I sanitized the yeast packet and scissors, and pitched the yeast, gently stirring it in.

I resealed the fermentation bucket and cleaned my utensils. Next, I used the rest of my sample to take an OG reading with a hydrometer. It looks like I have a reading of 1.110 at 71.6F, which adjusts for temperature (hydrometer calibrated to 60F) to OG 1.111.

Hydrometer reading.

Hydrometer reading.

I guess I should not have added all the sugar at once, so this is going to be a higher alcohol wine than I wanted, but that’s the way it goes sometimes. I just hope it tastes good! Montrachet yeast is supposed to have an alcohol tolerance of 13%, so if my FG comes in around 1.01-ish, it should be stopping anyway. (The color is good. The unfermented product is so sweet, it’s hard to get a real feel for flavor…but I think it will be good.)

***Update 8/27/15: Continuing to stir every evening, to break up the fruit floating at the top and submerge it all. Getting a nice steady action in the airlock. All appears to be on track. Obviously, it’s still extremely sweet; however, a small sip does have a little more fruit flavor than before, and a little taste of the fermentation.

After stirring down the fruit.

After stirring down the fruit.

Before stirring the floating fruit.

Before stirring the floating fruit.

Update 8/29/15: Stirred down the fruit in the fermentation bucket and noted that the appearance is pretty much the same as the above photos. I wonder if the blueberries that didn’t get crushed are fermenting? They don’t seem to be changing color…hmmm. The sample spoonful definitely has a flavor that has dropped in sweetness another notch.

Update 8/29/15: Continuing to convert sugar to alcohol…definitely a little more tannic feel in the mouth, more alcohol, and drier. I continue to note that the wine is still sweet, but what a difference! I like where this is going…at least, so far.

Again, before stirring down the fruit.

Again, before stirring down the fruit.


After stirring down the fruit.

After stirring down the fruit.

Sample for flavor and color.

Update 9/2/2015: Now tasting more like wine and less like sweet, fermenting juice. Photos aren’t showing any real difference, but the flavor is telling the tale!

Standard
Uncategorized

Bottling Jackfruit Cider

Jackfruit Cider going into bottles.

Jackfruit Cider going into bottles.

Time to bottle the jackfruit cider…or wine…or whatever it is. I started this project on June 2, 2015. I transferred the cider (for lack of better classification) to a small bucket, to combine from the 2-one gallon jugs and 1-half-full 1/2 gallon jug.

Combining jugs into a bucket for bottling.

Combining jugs into a bucket for bottling.

To that, I added 2 oz of sugar…maybe it will have enough yeast in suspension to carbonate, with enough time.

The color is a nice, light golden. It’s nice and clear, too. The flavor is, well…interesting. It’s pretty dry. It will be fun to see what this is like in a couple more months. The FG wound up at 0.990, down from an OG of 1.083, so that gives it a 12.21% ABV. Wowza!

The yield is 23 twelve ounce bottles.

The yield is 23 twelve ounce bottles.

Checking the final gravity.

Checking the final gravity.

Standard
Uncategorized

Brew Day! Mowing Ranier

The set-up. Mashing in and maintaining temp with a blanket and a "space blanket".

The set-up. Mashing in and maintaining temp with a blanket and a “space blanket”.


It took awhile to get organized this morning, but eventually, I got started. I began with 6.25 gallons of strike water heated to 149F…but it overshot a little. After I added the grains, the water came down to 150.8, but that’s okay. The mash went for 60 minutes. I checked it at 30 minutes and it was still 150.6F.

Next, I raised the temperature to 170F and did a mash-out for a few minutes and then did my usual rigged sparge with 2 gallons of water at 170F.

My McGyver sparge set-up.

My McGyver sparge set-up.

That put my boil at about 7 gallons. The pre-boil specific gravity reading was 1.035…a little lower that expected. Looking at my grain, I don’t think the brew shop double-milled the grain for “brew in a bag” (BIAB), as I requested and it looks like my efficiency is suffering for it.

After the sparge...looks like a pretty coarse crush.

After the sparge…looks like a pretty coarse crush.

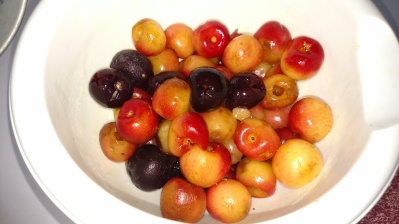
I’m not really hung up on the ABV, though. It’s supposed to be a “lawn mower” style beer anyway; this the name. If you aren’t familiar with the term, it means a beer suitable for after mowing the lawn. Lighter body, lower alcohol, refreshing. Plus this one has Mt. Ranier Cherries (I had to add a few regular ones to make up a pound), stems removed, pitted.

Mostly Mt Ranier cherries, stemmed and pitted.

Mostly Mt Ranier cherries, stemmed and pitted.

When I move it to secondary fermentation, I’ll be adding about a pound (minus a couple samples!) of dried Mt Ranier cherries. Have to make sure to get ones NOT processed with sunflower, or any other, oil.

So, after the sparge, I started the boil. I did remove about a gallon of wort to reduce the chance of boil-over. Once the boil was going, I added the first 1/2 oz of Citra hops. After 15 minutes, I added back the excess wort. I did get one small boil-over, but I reacted quickly and didn’t really lose much at all. After 45 minutes, I added the next 1/2 oz of Citra hops and 1 teaspoon of Irish Moss (to facilitate clearing). At 55 minutes, I added another 1/2 oz of Citra hops (the last hops addition will be a dry hop in secondary). At 3 minutes, I added the cherries.

Just about done with the boil.

Just about done with the boil.

Then it was time to use the wort chiller. Unfortunately, with the temps in the mid nineties daily, the water temp coming from the hose is 80F+. I was only able to get the wort down to about 84F. So, I brought the wort inside and transferred it to a carboy. Unfortunately, again, it’s difficult to transfer from a stock pot to a carboy…especially with cherries in the wort! I did sanitize everything, but I’m keeping my fingers crossed that there was no contamination. I used a stainless steel Kitchenaid mixing bowl and a rigged paper cup funnel to dip and pour the wort into the carboy. I could really use a brew kettle with a valve/spout. I wound up with about 5-1/2 gallons of wort in the carboy and about 3/4 gallon in a separate, small fermentation bucket. I think I’ll use the extra for a blackberry experiment.

I let the wort sit for awhile to cool a little more and then added the US-05 yeast. I sprinkled enough on the small batch to cover the top and the rest went into the carboy. I’m afraid the temp was still around 80-81F…thought I killed the yeast. But, the yeast survived! The next morning, there was good action going on.

It's alive! It's alive!

It’s alive! It’s alive!

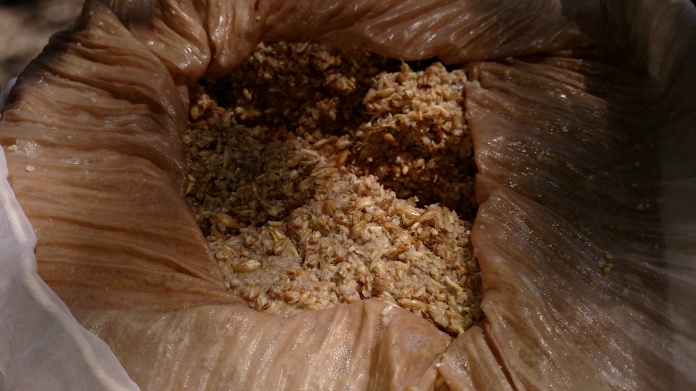
There is a possibility, at the higher temperatures, that some “fruity esters” will develop. They’re considered undesirable in most beers, but in a fruit beer, may be okay. If they do develop…meh. Maybe they’ll compliment the cherries. I’m not sure I would pick them out, anyway. Oh, and after I finished and cleaned everything up, I made two batches of spent  grain dog treats. That should last awhile…it’s over 3 pounds. The rest of the  used grain is feeding my compost bin.

Spent grain.

Spent grain.

Spent grain doggie treat dough, patted out and cut...ready for oven.

Spent grain doggie treat dough, patted out and cut…ready for oven.


Four bags of doggie treats, about 12 to 13 ounces each.

Four bags of doggie treats, about 12 to 13 ounces each.

Standard